Full
Tank Photography
 Having
shot the inhabitants of the tank, now it is time to get a view of the world
they live in. Full tank shots give us perspective as to the placement
and environment from which the macro shots were taken. Having
shot the inhabitants of the tank, now it is time to get a view of the world
they live in. Full tank shots give us perspective as to the placement
and environment from which the macro shots were taken.
Wide Angle Lenses
The space in front of our reef tanks is typically limited. In the case
of my personal tank, it is the width of a hallway. As such, we
often need to
use wide angle lenses to capture the entire view. Keeping in mind barrel distortion increases as we go wider, we want to shoot from as far
back as possible. This typically means shooting from across the room
from
the back wall.
If, however, we are lucky enough to have a football
stadium for a room, you do not need to shoot with a 1,000mm telephoto
lense, as this will create pincushion distortion effects (like poking
a pin into a cushion, the edges bow inwards, toward the center of the
image).
An ideal shot would be to be able to fill the frame
with the zoom set somewhere in the middle of the digicam's range.
Balancing Light
When photographing reef tank setups, we have the issue of dealing with
multiple independent light sources. Say our room is lit by
sunlight filtering in through a window. It seems a bit dim, so we
flip on our overhead halogen lights to brighten up the room. However, in contrast to the metal halides hanging
over our tank, the room still appears quite dark.
Multiple light sources further complicate the issue
by having different color temperatures from each source, and we must choose
one to base our white balance on.
 In
this example, our setup was exposed for the surroundings. The
cabinetry and walls are all properly exposed, however, the reef is completely blown
out and all we see is a blue blob. The ambient light levels were much
lower than that of the tank, and therefore the tank appears too bright. In
this example, our setup was exposed for the surroundings. The
cabinetry and walls are all properly exposed, however, the reef is completely blown
out and all we see is a blue blob. The ambient light levels were much
lower than that of the tank, and therefore the tank appears too bright.
|
 In this second photo, we exposed for the tank. Now the situation is
reversed. The tank is nicely exposed but the surroundings are too dark. We
need some supplemental lighting. In this second photo, we exposed for the tank. Now the situation is
reversed. The tank is nicely exposed but the surroundings are too dark. We
need some supplemental lighting. |
 In this photo, the tank lights were powered down and a flash was used
as the main source of light. As we can see, the tank is completely dark. We need to combine the two sources of light. In this photo, the tank lights were powered down and a flash was used
as the main source of light. As we can see, the tank is completely dark. We need to combine the two sources of light. |
 Here we used both sources of light taking care to balance the two so both areas of the image are properly exposed. We first set the camera
to measure the ambient light emanating from the tank, and used that to
set our exposure. We then used the flash to fill in the extra light needed
to expose the external surroundings properly. The result is a well balanced
photo that shows both the tank contents and its surroundings. Here we used both sources of light taking care to balance the two so both areas of the image are properly exposed. We first set the camera
to measure the ambient light emanating from the tank, and used that to
set our exposure. We then used the flash to fill in the extra light needed
to expose the external surroundings properly. The result is a well balanced
photo that shows both the tank contents and its surroundings. |
Reflections
When shooting glass or any other reflective surface, we need to pay special
attention to reflections. In the example below we can see the light source
(window) and the railing reflected off the glass. Not only is this distracting
to the viewer, but it also destroys contrast and makes it difficult to see the contents
of the tank.
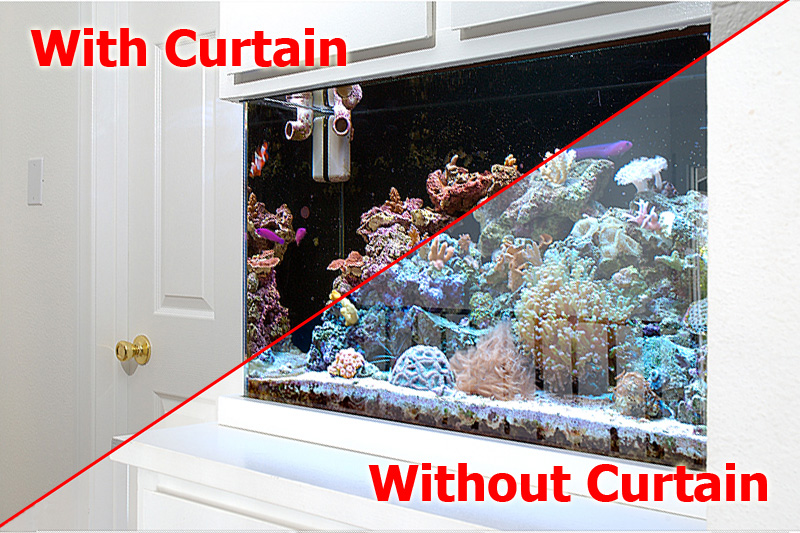
Curtain:
 
We want to keep light sources from reflecting off
the surface of the glass. The simplest way of dealing with reflections
is to find the source and block it. Roll the mouse cursor over the
image to the upper right to see the same shot taken without and with a
curtain. For the series of photographs above,
the reflection was eliminated by hanging a curtain, thereby blocking the
reflection source. The result is a series of shots with
good contrast and no distracting elements.
This method, however, does not work for secondary
reflections from the flash, as they occur in front of the curtain.
In this sample below, the flash reflection off the walls and molding wash
out the tank contents and we see what looks almost like a white sheet over
the tank.
Circular Polarizer:
 
A circular polarizer helps in these cases. Simply
pop the polarizer on the lense and turn until the reflections disappear.
The polarizer works by filtering out random scattered light and allowing
only direct reflected light through.
The employment of a circular polarizer on this photo
eliminated the reflections caused by the flash. To see its effect,
roll the mouse cursor over the photo on the upper right.
The downside of using a circular polarizer:
- Because it filters out light
it eats 1 to 2 stops of light.
- Circular Polarizing Filters are expensive - one
of the most expensive filters we can buy for our camera.
- One is needed for each different thread size we anticipate
using it on (lense diameter). Alternatively, we can get one for the
largest thread size we own, and use step down adapters for smaller lense
threads.
- It does not work on primary reflections, so don't
think you can take your digicam and use the popup flash in conjunction
with a polarizer and get reflection-less results, you will still have
the blinding white spot in the photo.
|